I have seen this all over the internet and with Hubby's birthday coming I hit the dollar store! Each glass literally cost me $1 because my Mom already had the paint. Here is the out come!
Simple 2oz Dollar store wine glass
Tape the stem with painters tape
Wrap the glass with newspaper and spray the base of the glass
Remember when you were a kid and the highest honor was to have your stuff on display "on the fridge?" Well, I have a stainless steel fridge and I cannot stick anything on it so this is my substitute, here I will display many things I am proud of and my "to do" lists as well. Enjoy!
Wednesday, August 24, 2011
Dollar Store Floral Pom Poms
So I have been home from work for the past two weeks and have taken full advantage of daytime TV! As I was watching Rachel Ray she had two women display things on a budget from the Dollar Store..one of the crafts was THIS! I never thought I would be able to use it so soon but Hubby surprised me with the theme he chose for his 40th birthday. Here are the fruits of my labor...
Start with flowers, whiffle ball, glue gun and ribbon
Tie ribbon to ball
Pull flowers from stems
Glue around bottom of flower
Attach flower to ball
Start with flowers, whiffle ball, glue gun and ribbon
Tie ribbon to ball
Pull flowers from stems
Glue around bottom of flower
Attach flower to ball
Baby Blanket Cupcakes 2
Tuesday, May 31, 2011
Baby Blanket Cupcakes
So a co worker is having a baby shower this Saturday and I wanted to make something inexpensive and yet CUTE! I wanted to find a cleaver way to give a simple gift so I scowered the internet to find ideas. I thought of diaper cakes and wreaths and then found washcloth suckers and suckers made of blankets but the thing I loved the most were the blanket cupcakes. I found a few blogs that had different instructions and in the end I had to adapt the folding a bit to get the effect and size that I wanted.
I started by purchasing a 4pk of blankets, coffee filters, ribbon, a cake box with a window and the red filler for the bottom of the box as well as stickers to decorate the outside of the box.
I dont know how but I ended up with an "all star all american boy" kinda theme but anyone who knows me knows Im crazy for the "red white and blue!"
So it took me SEVERAL tries to figure out how to fold the blankets. I finally ended up folding the blankets into big triangles and then just kept folding in half till I reached a size of aprox 2.5 inches...then I rolled. I LOVED the way the pattern came out on the blanket once in the filter. I secured with a rubber band then tied the ribbon around and put in the box. Once I figured out how I wanted the blankets folded, this entire project tooke me 15 mins. I love the way it turned out. I would love to do one for a girl!
Here are the pictures of the final product!
Saturday, May 7, 2011
Gourmet Strawberries
With tomorrow being Mother's Day I wanted to have a brunch for a few special women, my Mom, Mother in law, my Hubby's Grandmother and my Sister in law....well, do to circumstances beyond my control, things changed.
Hubby and I surprised our 4 year old Thursday with a trip to Legoland and as we drove to our destination I saw a strawberry stand and told Hubby that if they were still open when we left we would HAVE to get strawberries there....and we did. I scored big time! Three baskets for $9.50 and they are big and dark red and juicy!
Last night I went for it turned out these!!! I think they turned out great and only hope they taste as good as they look...
On the left is chocolate covered in mini chocolate chips, to the right of that is chocolate sprinkled in coconut, to the right of that is chocolate drizzled with white chocolate, next to that is white chocolate coconut and then last is white chocolate drizzled with milk chocolate.
Wednesday, March 2, 2011
Surprise party!
My husband decided he wanted to give his mother a surprise party for her 60th birthday....the ONLY problem was he only gave me 2 weeks notice and one of those weeks we were out of town WITH HER! I really only had 3 days to pull this off and put it together. Here are a few pictures I chose to share:
Close up of the label on the chocolate bingo cards I made
The chocolate bingo cards I made as favors for my mother in laws casino theme party
The flowers I put together for the tables
The very yummy cake I commissioned my brother to make
Saturday, February 5, 2011
Irish Car Bomb Cupcakes
When hubby and I finally decided to host a super bowl party, I went on the prowl for an awesome cupcake to serve! I wanted something that was "manly" and GOOD! I found a few recipes online and settled on this one from Annie's Eats. I love the cake and the ganache but the frosting is VERY sweet and I just do not like the grainy texture. I did NOT use as much Bailey's as it called for in the frosting. I did add a bit more powdered sugar and about 4 more tablespoons of butter. I also added a few tablespoons of milk and just a splash of vanilla. I'm "happy" with the frosting but next time will use my Grandmother's recipe and substitute the almond for the Bailey's.
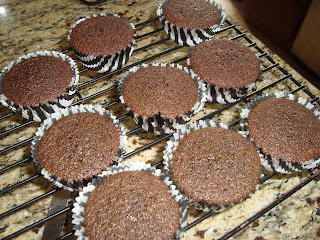
The cupcakes out of the oven
Cupcakes filled w/the ganache
Tuesday, January 25, 2011
The Line Up (so far)
Okay, we are going to have our second annual Super Bowl party. I made some things last year that were hits and some not so hits. So I will bring back what worked and try out some new things this year to see if they will be hits. Here is the line up for the menu:
Potato Skins
Lil Smokies in BBQ Sauce
Guacamole and Chips
Irish Car Bomb Cupcakes
Velveeta Queso Dip and Chips
Deviled Eggs and Olives
Hogs in a Sleeping Bag
Fried Ravioli
Potato Skins
Lil Smokies in BBQ Sauce
Guacamole and Chips
Irish Car Bomb Cupcakes
Velveeta Queso Dip and Chips
Deviled Eggs and Olives
Hogs in a Sleeping Bag
Fried Ravioli
Okay, now I am hungry. By the way, the pictures above are not mine, they are images from the internet that I am borrowing until I can post pictures from my actual party.
Saturday, January 22, 2011
Valentine's
I was searching for a Valentine's idea that was simple that I could make for my son's daycare class. I came across this....
I set out to find all the materials and had better luck than I thought! I already had the glue so I purchased 2 bags of the Valentine's Tootsie Pops, 1 package of card stock at Michael's, 2 packages of the google eyes at Michael's and the felt heart stickers I found in the dollar section at Target. This whole project is under $20 and I think its better than any of the pre-fabricated Valentine's sold in the boxes. I was looking at the Star Wars ones for my son then decided these would be better!
I started by loading my printer with the color card stock and printing the pattern from the above website. I then cut the all out and I did NOT take my time to make them perfect, I think they have more character this way. The guides provided for the slits for the sucker stick are a bit small so I cut mine a bit longer and then secured the sucker with a small piece of tape to prevent it from sliding out or turning. I then decorated the butterflies with the stickers and then inserted the suckers then glued on the eyes. Finished product, what do you think?
Tuesday, January 18, 2011
Banana Bread (Muffins)
I had a few bananas that I carted around with me this weekend for snacks and we never ate them. Well because they were in the heat, they started to brown. Rather than throw them away, I decided to make banana bread with them. Here is the recipe I found HERE:
Banana Bread Recipe
Ingredients;
3 or 4 ripe bananas, smashed
1/3 cup melted butter
1 cup sugar (can easily reduce to 3/4 cup)
1 egg, beaten
1 teaspoon vanilla
1 teaspoon baking soda
Pinch of salt
1 1/2 cups of all-purpose flour
No need for a mixer for this recipe. Preheat the oven to 350°F (175°C). With a wooden spoon, mix butter into the mashed bananas in a large mixing bowl. Mix in the sugar, egg, and vanilla. Sprinkle the baking soda and salt over the mixture and mix in. Add the flour last, mix. Pour mixture into a buttered 4x8 inch loaf pan. Bake for 1 hour. Cool on a rack. Remove from pan and slice to serve.
Note; instead of baking a loaf, I put it into cupcake liners and made muffins. These only need to bake about 30-35 minutes, NOT an hour. And I only used 3 bananas, not 4.
Subscribe to:
Posts (Atom)